By Yamuno Team
28 Mar 2026
4 min read
There are plenty of reasons you might need your Confluence docs in markdown — migrating to another platform, publishing to a static site, syncing with a Git repo, or just keeping an offline backup. Whatever the reason, Confluence's built-in export doesn't give you clean markdown. It gives you HTML or PDF.
Markdown Exporter & Importer for Confluence fills that gap. Here's exactly how to use it.
Best for: grabbing one page quickly — a README, an architecture doc, a runbook.
.md fileThe exported file includes all inline images and attachments (downloaded locally), code blocks with syntax highlighting, tables, lists, and formatting. Images are referenced with relative paths so they stay linked correctly.
Best for: exporting a section of your docs — e.g. a product's documentation, a project wiki, or an onboarding guide.
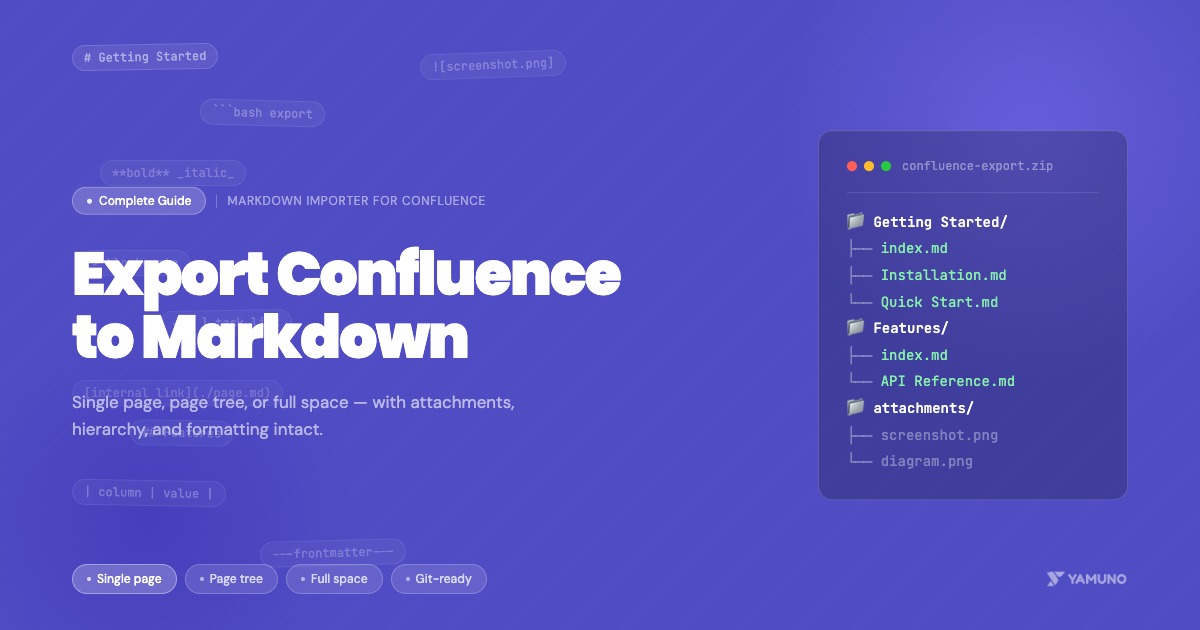
The ZIP preserves your page hierarchy as folders:
confluence-export/
├── Getting Started/
│   ├── index.md
│   ├── Installation.md
│   └── Quick Start.md
├── Features/
│   ├── index.md
│   └── API Reference.md
└── attachments/
    ├── Getting Started/
    │   └── screenshot.png
    └── Features/
        └── diagram.png
Internal links between pages are converted to relative markdown links, so cross-references stay intact.
Best for: full space backups, platform migrations, or archiving completed projects.
The output structure mirrors your Confluence space, with all pages, child pages, and attachments organized in folders matching the page tree.
The exporter converts all standard Confluence content to clean markdown:
Export your Confluence space and drop it straight into MkDocs, Docusaurus, or Jekyll. The folder structure and relative links work out of the box with most static site generators.
Export your docs, push them to a docs/ folder in your repo, and your Confluence content is now version-controlled. You can reverse the flow too — edit in Git, import back to Confluence with the same app.
Markdown is the closest thing to a universal documentation format. Export from Confluence, then import into Notion, GitHub Wiki, GitLab Wiki, or wherever you're moving.
Run a space export regularly and store the ZIP in S3, Google Drive, or a Git repo. It's a lightweight, readable backup you can actually open without special software.
Start small. Export a single page or a small section first to check the output before running a full space export.
Large spaces take time. Keep the browser tab open during export — closing it can interrupt the process.
Check complex macros. Most Confluence macros convert cleanly, but heavily customised layouts may need a manual review after export.
Use frontmatter for tracking. Enable the metadata option to include page titles, IDs, and dates as YAML frontmatter — useful if you're building a pipeline that needs to track which pages have changed.
Install Markdown Exporter & Importer for Confluence from the Atlassian Marketplace — free to try, no credit card required.
Full export documentation is at /docs/markdown-importer-for-confluence.
Questions? Reach out via our support portal.
Featured App
Convert Between Markdown Files and Confluence Pages Effortlessly
Get product updates and tips straight to your inbox.
No spam, ever.
Jira's default reporting is useful but limited. Here's how to set up charts that actually help you track issue progress, workload distribution, and sprint health in one place.
Read more
Sharing Confluence documentation with clients who don't have Confluence access is a common problem. Here's how solutions engineers and technical writers export polished, professional PDFs without manual formatting.
Read more
Confluence spaces accumulate attachments fast — and most of them are never referenced again. Here's how to audit, filter, and clean up attachments across your instance without breaking anything.
Read more